The Ultimate Setup Guide for Your Google Nest Doorbell Wired 3Rd Gen
Introduction
The Google Nest Doorbell Wired 3Rd Gen represents a popular choice for homeowners and renters looking to upgrade entryway security with a dependable, always-powered smart doorbell. This guide walks through everything a buyer or new owner needs: an honest product analysis, step-by-step setup instructions, real-world use cases, compatibility checks, configuration tips, troubleshooting help, and a practical buying guide. The tone is editorial and informative to help readers decide whether this wired Nest doorbell fits their needs and how to get the most from it after installation.
Product review and analysis
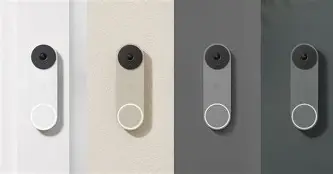
The wired Nest Doorbell is designed to replace a traditional hardwired mechanical or electronic doorbell and deliver smart functionality through the Google Home (Nest) ecosystem. As a hardwired unit, it relies on the home’s doorbell transformer for continuous power, eliminating the need for periodic battery swaps and enabling more consistent operation, especially for live view and motion-based video capture.
Core strengths include always-on power, integration with Google Home devices, reliable two-way audio for doorstep conversations, person and package detection (when paired with Nest Aware subscription), and configurable motion zones to reduce unwanted alerts. The device is engineered to be weather-resistant and typically offers a wide field of view suitable for most front-porch scenarios.
Areas buyers typically scrutinize are subscription requirements for extended video history and advanced detection, chime compatibility in older homes, and placement limitations for optimal field of view. The wired model addresses battery anxieties but introduces wiring and transformer compatibility considerations some DIYers must plan for.
What to expect in the box
- Google Nest Doorbell (Wired) unit
- Mounting plate and screws (flat and angled options)
- Wire extenders and mounting anchors
- Quick start guide and safety instructions
- Optional chime connector or instructions for chime-box wiring
Key features to highlight
- Continuous power: No batteries to recharge or replace.
- App control: Live view, two-way talk, and notification management through Google Home / Nest app.
- Smart detection: Detects people and packages, with richer capabilities unlocked via Nest Aware.
- Integration: Works with Google Home speakers and displays for hands-free announcements and live view casting.
- Weather resistance: Designed for outdoor use in typical residential conditions.
Real-world use cases
Understanding how the Nest Doorbell performs in everyday scenarios helps buyers make practical choices.
- Package deliveries: Residents who receive frequent packages benefit from package detection and two-way audio to instruct couriers where to leave parcels.
- Child safety and comings/goings: Parents can quickly check on children arriving home after school without stepping outside.
- Nighttime monitoring: Homeowners who want clear nighttime visibility for the porch and immediate approach area appreciate the night vision performance and consistent power supply.
- Small-business storefronts: Small business owners can use the doorbell for short-term monitoring of a shop entrance during off-hours when continuous power helps maintain readiness.
- Renter-friendly setups: Renters seeking minimal long-term commitments may install the wired unit where landlord permission exists; however, they should consider mounting and wiring expectations before signing a lease addendum.
Before you start: compatibility and checklist
Prior to purchase or installation, verify the following items to avoid common pitfalls.
- Existing mechanical or electronic doorbell: The wired Nest is designed to replace an existing doorbell button and should connect to a doorbell transformer. Confirm a wired chime and transformer are present.
- Transformer voltage: Verify the home transformer provides a compatible AC output (many common doorbell transformers used in residential settings fall within a typical range). If unsure, consult a qualified electrician.
- Chime compatibility: Older chime boxes can require a chime connector to prevent buzzing or to allow the chime to function correctly.
- Wi‑Fi coverage: Ensure robust Wi‑Fi signal at the front door. Consider a mesh extender or repositioning the router if the signal is weak.
- Smart home ecosystem: The device integrates best in a Google-centric environment; consider whether Google Home integration is desired.
Step-by-step setup guide
Note: If the installer is not comfortable working with household electrical wiring, it is recommended to hire a professional. The steps below give a clear roadmap for a typical DIY installation.
Looking for the best Electronics deals on Amazon?
See Deals →1. Prepare and power down
- Turn off power to the doorbell transformer at the circuit breaker to avoid shocks.
- Confirm power is off by pressing the existing doorbell button after turning off the breaker — there should be no chime.
2. Remove the old doorbell button
- Unscrew and pull out the old doorbell button, exposing the two low-voltage wires. Take note of wire positions but they are not polarity-sensitive.
3. Mount the plate and run the wiring
- Choose the supplied mounting plate that matches the mounting surface. If the entrance has an angled or recessed frame, use the angle plate included to improve the field of view.
- Feed the two doorbell wires through the back of the plate and secure the plate with the supplied screws and anchors.
4. Connect the wires
- Attach the two wires to the Nest Doorbell terminals (the order does not matter). Make sure connections are secure to avoid intermittent power loss.
- If a mechanical chime is in the house, install the included chime connector in the chime box according to the manufacturer’s instructions.
5. Power up and app setup
- Turn the breaker back on to re-energize the transformer. The doorbell should power up; indicator lights in the unit or app will confirm readiness.
- Open the Google Home (or Nest) app and choose “Add device.” Follow in-app prompts to scan the QR code on the device or enter setup mode.
- Connect the device to the home Wi‑Fi network and assign it to the correct home and room within the app.
6. Positioning and final adjustments
- Use live view to verify camera framing. Adjust the tilt or swap to the angled mount if needed to capture the walkway or porch area.
- Set motion zones and sensitivity to reduce false positives from street traffic or nearby trees.
- Test two-way audio and chime operation from multiple rooms to confirm full functionality.
Configuration, settings and optimization
After the physical installation, spend time in the app tailoring detection, notifications, and integrations to match real-world needs.
Motion zones and sensitivity
Define specific regions the camera should monitor (porch, walkway) and exclude areas like the street to avoid unnecessary alerts. Lowering sensitivity or narrowing zones reduces false alarms from passing cars or pets.
Notifications and schedules
Customize when and how alerts are delivered—instant push notifications, brief chime announcements through Google Home speakers, or silent periods during specified hours. Use schedules to mute notifications at predictable times such as overnight.
Privacy and sharing
Configure video sharing and account access carefully. Grant access only to trusted household members and review camera activity logs periodically. Disable features that share live view links if privacy is a concern.
Nest Aware and feature trade-offs
Basic live view and person alerts are available out of the box, but advanced features—such as face recognition, extended video history, and continuous event recording—are typically part of a Nest Aware subscription. Evaluate how important longer-term video retention and advanced detection are to decide whether to subscribe.
Troubleshooting common issues
- No power after wiring: Verify breaker is on and transformer is functional. Check that wires have good contact in the terminals. If the chime buzzes or unit reboots, the chime connector may be misinstalled.
- Weak Wi‑Fi signal: Consider moving the router, adding a mesh node, or using a wired access point nearest the door to stabilize video quality.
- False motion alerts: Restrict motion zones, lower sensitivity, and consider adjusting mounting angle to avoid trees or public walkways.
- Chime not working: Re-check the chime connector and wiring diagram. Some older chime boxes require a different connector or additional wiring modifications.
- Audio problems: Test two-way audio and speaker output. If the visitor reports poor audio, verify the unit is not obstructed and that the microphone openings are clean.
Pros & Cons
- Pros
- Always-powered operation eliminates battery maintenance
- Seamless integration with Google Home devices
- Reliable two-way communication and app-based control
- Customizable motion zones and notification settings
- Weather-resistant design for outdoor use
- Cons
- Requires compatible doorbell transformer and wiring—may need electrician help
- Advanced features are gated behind a subscription
- Placement can be limited by doorframe geometry and Wi‑Fi reach
- Not ideal for those who cannot modify wiring (renters without permission)
Comparison table
| Product | Power | Typical Features | Best for |
|---|---|---|---|
| Google Nest Doorbell Wired 3Rd Gen | Hardwired (continuous) | Live view, two-way audio, person/package detection, app integration | Homes with existing chime and compatible transformer; users who prefer no batteries |
| Google Nest Doorbell (Battery) | Rechargeable battery | Portable install, flexible placement, motion and person alerts | Renters or properties without doorbell wiring; installations where running wires is impractical |
| Previous Wired Generation | Hardwired | Similar core features, may have older detection models or different resolution | Budget-conscious buyers upgrading from older systems, or those seeking a lower-cost wired option |
Buying guide: what to consider before purchasing
The right choice depends on the home, lifestyle, and priorities. Use the checklist below to evaluate fit.
1. Power and wiring
If the home already has a wired doorbell and transformer, the wired Nest doorbell is often the most maintenance-free option. For properties without wiring or where changes are prohibited, the battery model may be a better fit.
Discover deals on Electronics — updated daily.
See Deals →2. Wi‑Fi strength
Smart doorbells stream video and rely on stable Wi‑Fi. Test signal strength at the intended mounting point. If the signal is weak, plan for a mesh extension or an access point.
3. Chime and transformer compatibility
Confirm the existing chime works with electronic smart doorbells and that the transformer provides sufficient power. When in doubt, consult the doorbell’s compatibility documentation or an electrician.
4. Subscription needs
Decide whether advanced features such as longer video storage, person/face recognition history, or continuous recording are important. If so, include the cost of a subscription in the total ownership calculation.
5. Privacy and household access
Consider how many household members will access the camera and whether they are comfortable with cloud-based storage and sharing. Evaluate privacy settings and account permissions in advance.
6. Placement and field of view
Measure the approach to the door and choose a camera that covers the most critical area. Angled mounts can help when the doorway is recessed or the path approaches from an angle.
Final tips and best practices
- Run a test recording after installation to check framing, audio clarity, and notification behavior before finalizing placement.
- Label the account and camera location in the app so multiple cameras in a property are easy to manage.
- Keep the firmware updated through the app to receive the latest security patches and performance improvements.
- If privacy is a concern, use schedules or geofencing to limit live view access during private events.
- For multi-dwelling units, confirm landlord permissions and local building rules before performing any wiring changes.
Conclusion
The Google Nest Doorbell Wired 3Rd Gen is a compelling option for people who want a low-maintenance, always-on smart doorbell that integrates with the Google Home ecosystem. Its wired design eliminates battery anxiety and supports consistent performance for live view and notifications. Prospective buyers should weigh wiring and chime compatibility, Wi‑Fi coverage, and whether advanced detection and video history justify a subscription. With careful planning—checking transformer compatibility, optimizing placement and motion zones, and tailoring notifications—most homeowners will find the wired Nest doorbell a practical, secure upgrade for their entryway monitoring needs.